BigSnarf blog

Infosec FTW

Building your first neural network self driving car in Python


1. Get RC Car

2. Learn to drive it

3. Take apart car to see controllers and wireless controller

4. Soldering Iron and Multimeter to determine positive and negative and circuits firing

Testing – Link Mac to Arduino to Wireless Controller

5. Need Arduino board and cable

6. Install software and load Arduino program onto board

7. Install pygame and serial


// Car Control v. 0.2
// http://thelivingpearl.com/2013/01/04/drive-a-lamborghini-with-your-keyboard/
int reversePin = 9;
int forwardPin = 8;
int leftPin = 7;
int rightPin = 6;
int order = 55;
int time = 75;
//control flag
int flag = 0;
void forward(int time){
Serial.println("This is forward…");
digitalWrite(forwardPin, LOW);
delay(time);
digitalWrite(forwardPin,HIGH);
}
void reverse(int time){
Serial.println("This is reverse…");
digitalWrite(reversePin, LOW);
delay(time);
digitalWrite(reversePin,HIGH);
}
void left(int time){
Serial.println("This is left…");
digitalWrite(leftPin, LOW);
delay(time);
digitalWrite(leftPin,HIGH);
}
void right(int time){
Serial.println("This is right…");
digitalWrite(rightPin, LOW);
delay(time);
digitalWrite(rightPin,HIGH);
}
void leftTurnForward(int time){
digitalWrite(forwardPin, LOW);
digitalWrite(leftPin, LOW);
delay(time);
off();
}
void rightTurnForward(int time){
digitalWrite(forwardPin, LOW);
digitalWrite(rightPin, LOW);
delay(time);
off();
}
void leftTurnReverse(int time){
digitalWrite(reversePin, LOW);
digitalWrite(leftPin, LOW);
delay(time);
off();
}
void rightTurnReverse(int time){
digitalWrite(reversePin, LOW);
digitalWrite(rightPin, LOW);
delay(time);
off();
}
void demoOne(){
int demoTime = 500;
forward(demoTime);
reverse(demoTime);
left(demoTime);
right(demoTime);
}
void demoTwo(){
int demoTime = 500;
rightTurnForward(demoTime);
leftTurnForward(demoTime);
rightTurnReverse(demoTime);
leftTurnReverse(demoTime);
}
void off(){
digitalWrite(9, HIGH);
digitalWrite(8, HIGH);
digitalWrite(7, HIGH);
digitalWrite(6, HIGH);
}
void orderControl(int order, int time){
switch (order){
//off order
case 0: off(); break;
//demo modes
case 1: demoOne(); order=0; break;
case 2: demoTwo(); order=0; break;
case 3: demoOne(); demoTwo(); order=0; break;
//movment options
case 11: forward(time); order=0; break;
case 12: reverse(time); order=0; break;
case 13: right(time); order=0; break;
case 14: left(time); order=0; break;
//complex movment
case 21: rightTurnForward(time); order=0; break;
case 22: leftTurnForward(time); order=0; break;
case 23: rightTurnReverse(time); order=0; break;
case 24: leftTurnReverse(time); order=0; break;
//no match…
default: Serial.print("\nINVALID ORDER!… TURNING OFF!\n");
}
}
void setup() {
// initialize the digital pins as an output.
pinMode(rightPin, OUTPUT);
pinMode(leftPin, OUTPUT);
pinMode(forwardPin, OUTPUT);
pinMode(reversePin, OUTPUT);
Serial.begin(115200);
Serial.print("\n\nStart…\n");
}
void loop() {
//Turn everything off…
off();
//get input
if (Serial.available() > 0){
order = Serial.read() – 65;
Serial.print("I received: ");
Serial.println(order);
flag = 1;
}
if(flag){
//complete orders
orderControl(order,time);
}
}

view raw

gistfile1.txt

hosted with ❤ by GitHub

8. python carDriving.py to test soldering and driving by keyboard


# http://thelivingpearl.com/2013/01/04/drive-a-lamborghini-with-your-keyboard/
import serial
import pygame
import os
from pygame.locals import *
def clear_screen():
os.system('clear')
def getOrder(run):
for event in pygame.event.get():
if (event.type == KEYDOWN):
keyinput = pygame.key.get_pressed();
#complex orders
if keyinput[pygame.K_UP] and keyinput[pygame.K_RIGHT]:
run[1] = 21;
elif keyinput[pygame.K_UP] and keyinput[pygame.K_LEFT]:
run[1] = 22;
elif keyinput[pygame.K_DOWN] and keyinput[pygame.K_RIGHT]:
run[1] = 23;
elif keyinput[pygame.K_DOWN] and keyinput[pygame.K_LEFT]:
run[1] = 24;
#simple orders
elif keyinput[pygame.K_UP]:
run[1] = 11;
elif keyinput[pygame.K_DOWN]:
run[1] = 12;
elif keyinput[pygame.K_RIGHT]:
run[1] = 13;
elif keyinput[pygame.K_LEFT]:
run[1] = 14;
elif keyinput[pygame.K_1]:
run[1] = 1;
elif keyinput[pygame.K_2]:
run[1] = 2;
elif keyinput[pygame.K_3]:
run[1] = 3;
#exit
elif keyinput[pygame.K_x] or keyinput[pygame.K_q]:
print 'exit';
run[0] = False;
run[1] = 0;
elif event.type == pygame.KEYUP:
#single key
if (run[1] < 20):
run[1] = 0;
#up-right
elif (run[1] == 21):
if event.key == pygame.K_RIGHT:
run[1] = 11;
elif event.key == pygame.K_UP:
run[1] = 13;
#up-left
elif (run[1] == 22):
if event.key == pygame.K_LEFT:
run[1] = 11;
elif event.key == pygame.K_UP:
run[1] = 14;
#back-right
elif (run[1] == 23):
if event.key == pygame.K_RIGHT:
run[1] = 12;
elif event.key == pygame.K_DOWN:
run[1] = 13;
#back-left
elif (run[1] == 24):
if event.key == pygame.K_LEFT:
run[1] = 12;
elif event.key == pygame.K_DOWN:
run[1] = 14;
return run;
def main():
clear_screen()
print '\nStarting CarControl v.0.3\n';
ser = serial.Serial('/dev/tty.usbmodem411', 115200, timeout=1);
pygame.init();
run = [True,0];
previous = -1
while run[0]:
run = getOrder(run);
#debug
#print 'current orders: ' + str(run[1]);
if (run[1] != previous):
previous = run[1];
ser.write(chr(run[1] + 65));
print run[1];
ser.close();
exit('\nGoodbye!\n')
if __name__ == "__main__":
main()

view raw

gistfile1.txt

hosted with ❤ by GitHub

Screen Shot 2016-07-31 at 10.28.15 AM


Testing – Capturing image data for training dataset

IMG_0319-1024x683

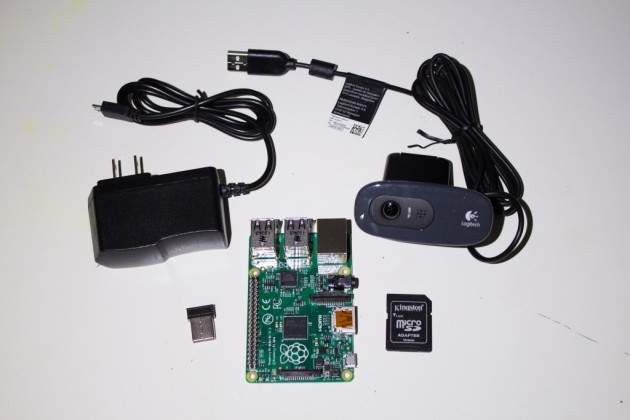
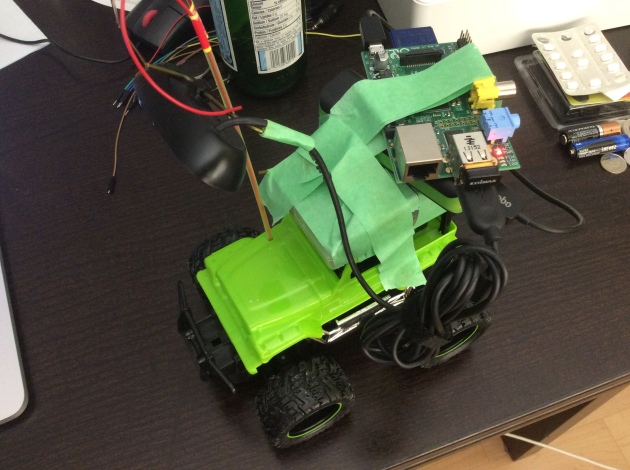
On the first iteration of the physical devices, I mounted the disassembled Logitech C270/Raspberry Pi on the car with a coat hanger that I chopped up and modified to hold the camera. I pointed it down so it could see the hood and some of the “road”. The webcam  captures video frames of the road ahead  at ~24 fps.

I send the captured stream across the wifi network back to my MacBookPro using python server implementation using basic sockets.

On my MacBookPro laptop computer, I run another client python program to connect to Raspberry Pi using basic sockets. I take the stream color stream 320×240 and down sample and grayscale video frames for preprocessing into a numpy matrix.

Wirelessly stream video and capture using opencv2 and slice into jpeg, preprocess and reshape numpy and feed array into with  key press data as label.

Testing – First Build of Car with components

IMG_0496

Testing – Convert 240×240 into greyscale


# label pixel0 pixel1 pixel2 pixel3 pixel4 pixel5 pixel6 pixel7 pixel8
# 1 0 0 0 0 0 0 0 0 0
# 0 0 0 0 0 0 0 0 0 0
from skimage import color
from skimage import io
img = color.rgb2gray(io.imread('001.jpg'))
img
x1 = 0
x2 = 240
y1 = 0
y2 = 240
cropped = img[x1:x2,y1:y2]
io.imsave("/Users/benchemployee/Desktop/kaggle/selfDriving/cropped.jpg", cropped)

view raw

gistfile1.txt

hosted with ❤ by GitHub

57600 input neurons

Take 2 : Using PiCamera and stream images to Laptop


__author__ = 'zhengwang'
import numpy as np
import cv2
import serial
import pygame
from pygame.locals import *
import socket
class CollectTrainingData(object):
def __init__(self):
self.server_socket = socket.socket()
self.server_socket.bind(('192.168.1.72', 8000))
self.server_socket.listen(0)
# accept a single connection
self.connection = self.server_socket.accept()[0].makefile('rb')
# connect to a seral port
self.ser = serial.Serial('/dev/cu.usbserial-AM01VDMD', 115200, timeout=1)
self.send_inst = True
# create labels
self.k = np.zeros((4, 4), 'float')
for i in range(4):
self.k[i, i] = 1
self.temp_label = np.zeros((1, 4), 'float')
def collect_image(self):
saved_frame = 0
total_frame = 0
# collect images for training
print('Start collecting images…')
e1 = cv2.getTickCount()
image_array = np.zeros((1, 38400))
label_array = np.zeros((1, 4), 'float')
# stream video frames one by one
try:
stream_bytes = ' '
frame = 1
while self.send_inst:
stream_bytes += self.connection.read(1024)
first = stream_bytes.find('\xff\xd8')
last = stream_bytes.find('\xff\xd9')
if first != -1 and last != -1:
jpg = stream_bytes[first:last + 2]
stream_bytes = stream_bytes[last + 2:]
image = cv2.imdecode(np.fromstring(jpg, dtype=np.uint8), cv2.CV_LOAD_IMAGE_GRAYSCALE)
# select lower half of the image
roi = image[120:240, :]
# save streamed images
cv2.imwrite('training_images/frame{:>05}.jpg'.format(frame), image)
#cv2.imshow('roi_image', roi)
cv2.imshow('image', image)
# reshape the roi image into one row array
temp_array = roi.reshape(1, 38400).astype(np.float32)
frame += 1
total_frame += 1
# get input from human driver
for event in pygame.event.get():
if event.type == KEYDOWN:
key_input = pygame.key.get_pressed()
# complex orders
if key_input[pygame.K_UP] and key_input[pygame.K_RIGHT]:
print("Forward Right")
image_array = np.vstack((image_array, temp_array))
label_array = np.vstack((label_array, self.k[1]))
saved_frame += 1
self.ser.write(chr(6))
elif key_input[pygame.K_UP] and key_input[pygame.K_LEFT]:
print("Forward Left")
image_array = np.vstack((image_array, temp_array))
label_array = np.vstack((label_array, self.k[0]))
saved_frame += 1
self.ser.write(chr(7))
elif key_input[pygame.K_DOWN] and key_input[pygame.K_RIGHT]:
print("Reverse Right")
self.ser.write(chr(8))
elif key_input[pygame.K_DOWN] and key_input[pygame.K_LEFT]:
print("Reverse Left")
self.ser.write(chr(9))
# simple orders
elif key_input[pygame.K_UP]:
print("Forward")
saved_frame += 1
image_array = np.vstack((image_array, temp_array))
label_array = np.vstack((label_array, self.k[2]))
self.ser.write(chr(1))
elif key_input[pygame.K_DOWN]:
print("Reverse")
saved_frame += 1
image_array = np.vstack((image_array, temp_array))
label_array = np.vstack((label_array, self.k[3]))
self.ser.write(chr(2))
elif key_input[pygame.K_RIGHT]:
print("Right")
image_array = np.vstack((image_array, temp_array))
label_array = np.vstack((label_array, self.k[1]))
saved_frame += 1
self.ser.write(chr(3))
elif key_input[pygame.K_LEFT]:
print("Left")
image_array = np.vstack((image_array, temp_array))
label_array = np.vstack((label_array, self.k[0]))
saved_frame += 1
self.ser.write(chr(4))
elif key_input[pygame.K_x] or key_input[pygame.K_q]:
print 'exit'
self.send_inst = False
self.ser.write(chr(0))
break
elif event.type == pygame.KEYUP:
self.ser.write(chr(0))
# save training images and labels
print("train")
train = image_array[1:, :]
print("label")
train_labels = label_array[1:, :]
# save training data as a numpy file
print("np")
np.savez('training_data_temp/test08.npz', train=train, train_labels=train_labels)
e2 = cv2.getTickCount()
# calculate streaming duration
time0 = (e2 – e1) / cv2.getTickFrequency()
print('Streaming duration:', time0)
print(train.shape)
print(train_labels.shape)
print('Total frame:', total_frame)
print('Saved frame:', saved_frame)
print('Dropped frame', total_frame – saved_frame)
finally:
self.connection.close()
self.server_socket.close()
if __name__ == '__main__':
print("Entering main function")
print("Press q to quit on the video capture pygame area")
print("Initializing pygame")
pygame_init = pygame.init()
print("Initializing Collection of Training Data Object")
ctd = CollectTrainingData()
print("Server Sockets setup")
ctd.collect_image()

Take 2 -Load new Arduino Sketch and change PINS


// assign pin num
int right_pin = 6;
int left_pin = 7;
int forward_pin = 10;
int reverse_pin = 9;
// duration for output
int time = 50;
// initial command
int command = 0;
void setup() {
pinMode(right_pin, OUTPUT);
pinMode(left_pin, OUTPUT);
pinMode(forward_pin, OUTPUT);
pinMode(reverse_pin, OUTPUT);
Serial.begin(115200);
}
void loop() {
//receive command
if (Serial.available() > 0){
command = Serial.read();
}
else{
reset();
}
send_command(command,time);
}
void right(int time){
digitalWrite(right_pin, LOW);
delay(time);
}
void left(int time){
digitalWrite(left_pin, LOW);
delay(time);
}
void forward(int time){
digitalWrite(forward_pin, LOW);
delay(time);
}
void reverse(int time){
digitalWrite(reverse_pin, LOW);
delay(time);
}
void forward_right(int time){
digitalWrite(forward_pin, LOW);
digitalWrite(right_pin, LOW);
delay(time);
}
void reverse_right(int time){
digitalWrite(reverse_pin, LOW);
digitalWrite(right_pin, LOW);
delay(time);
}
void forward_left(int time){
digitalWrite(forward_pin, LOW);
digitalWrite(left_pin, LOW);
delay(time);
}
void reverse_left(int time){
digitalWrite(reverse_pin, LOW);
digitalWrite(left_pin, LOW);
delay(time);
}
void reset(){
digitalWrite(right_pin, HIGH);
digitalWrite(left_pin, HIGH);
digitalWrite(forward_pin, HIGH);
digitalWrite(reverse_pin, HIGH);
}
void send_command(int command, int time){
switch (command){
//reset command
case 0: reset(); break;
// single command
case 1: forward(time); break;
case 2: reverse(time); break;
case 3: right(time); break;
case 4: left(time); break;
//combination command
case 6: forward_right(time); break;
case 7: forward_left(time); break;
case 8: reverse_right(time); break;
case 9: reverse_left(time); break;
default: Serial.print("Inalid Command\n");
}
}

view raw

arduino

hosted with ❤ by GitHub

Take 2 – Stream Data from Pi to Laptop


"""
Reference:
PiCamera documentation
https://picamera.readthedocs.org/en/release-1.10/recipes2.html
https://github.com/hamuchiwa/AutoRCCar
"""
import io
import socket
import struct
import time
import picamera
# create socket and bind host
client_socket = socket.socket(socket.AF_INET, socket.SOCK_STREAM)
client_socket.connect(('192.168.1.72', 8000))
connection = client_socket.makefile('wb')
try:
with picamera.PiCamera() as camera:
camera.resolution = (320, 240) # pi camera resolution
camera.framerate = 10 # 10 frames/sec
time.sleep(2) # give 2 secs for camera to initilize
start = time.time()
stream = io.BytesIO()
# send jpeg format video stream
for foo in camera.capture_continuous(stream, 'jpeg', use_video_port = True):
connection.write(struct.pack('<L', stream.tell()))
connection.flush()
stream.seek(0)
connection.write(stream.read())
if time.time() – start > 600:
break
stream.seek(0)
stream.truncate()
connection.write(struct.pack('<L', 0))
finally:
connection.close()

Train Neural Network with train.pkl

Converted numpy data to pickle and then use it for training python simple 3 layer neural network. 65536 neurons for input layer,  1000 neurons for hidden layer and 4 output neurons.  Forward, None, Left, and Right.


Check predictions of Neural Network


Test driving car via key press

Test driving car via prediction


Test trained Neural Network with live camera data…enjoy!


Links

Next Steps

  • Deep Learning
  • Computer Vision
  • Vehicle Dynamics
  • Controllers
  • Localization,
  • Mapping (SLAM)
  • Sensors & Fusion
  • Safety Systems and Ethics

ReportStyleDocumentaton build RC custom


Leave a comment